Alright, let's talk projectors. Because honestly, if you're building a sim, you can have the fanciest launch monitor on the planet, but if your picture looks like a blurry mess in a dimly lit cave, what's the point? I learned this the hard way, like most things in my golf life.
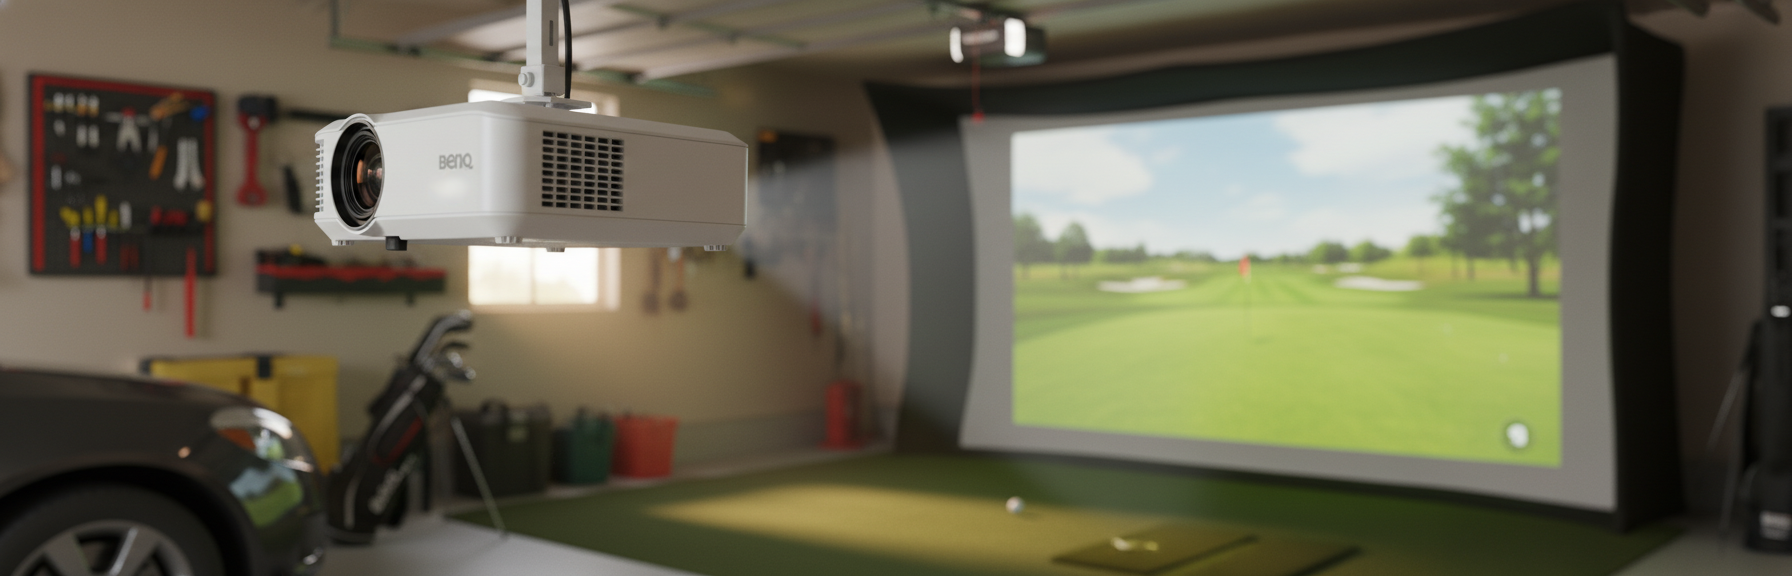
When I decided to pull the trigger on my garage sim – 10 feet wide, 9 feet high, 18 feet deep – I initially thought, "A projector's a projector, right? Just throw a picture up there." WRONG. My first budget projector was a cheap eBay special, and it was about as bright as a rainy day in Scotland. The image was dull, washed out, and frankly, it took away from the immersion. It felt like I was playing on a Wii. So, learn from my shank: the projector is where your golf course comes to life. Don't skimp here.
Before we dive deep, here's the quick-and-dirty on some popular picks. This isn't exhaustive, but it covers the main contenders you'll see folks recommending in the forums.
Golf Sim Projector Quick Comparison
| Model | Resolution | Lumens (ANSI) | Throw Ratio | Price (Approx.) | Mack's Take |
|---|---|---|---|---|---|
| BenQ TH671ST | 1080p | 3000 | 0.69:1 | $700 - $800 | My first "real" sim projector. Solid workhorse, great value. |
| Optoma GT1080HDR | 1080p | 3800 | 0.50:1 | $800 - $900 | Brighter, shorter throw, fantastic for tight spaces. |
| Optoma GT2000HDR | 1080p | 3500 | 0.50:1 | $1000 - $1100 | Newer GT, brighter lamp, longer life, excellent clarity. |
| BenQ TK700STi | 4K UHD | 3000 | 0.9-1.08:1 | $1300 - $1500 | For the 4K purists. Great picture, but a longer short-throw. |
Prices are estimates and fluctuate based on sales and retailers.
The Core Specs That Actually Matter
Forget the marketing jargon for a minute. For a golf simulator, only a few numbers really impact your experience.
Lumens: Your Sunscreen for a Bright Bay
This is probably the most argued-about spec online. Lumens measure brightness. More lumens = brighter picture. Simple, right? Not quite.
- My Mistake: I thought 2000 lumens was "good enough." It wasn't. My garage has a couple of windows, and even with blackout curtains, ambient light is a factor. That budget projector with its advertised 2000 lumens felt more like 1000 in reality. The image was washed out, especially on brighter course elements like blue skies or white bunkers.
- The Sweet Spot: For a dedicated, fairly dark sim bay (like my garage at night), 3000 ANSI lumens is a solid baseline. If you have any significant ambient light – a window you can't black out completely, a door that leaks light, or if you just like to keep some lights on – you'll want to aim for 3500+ ANSI lumens.
- Why it matters: A bright image means better contrast, more vibrant colors, and less eye strain. It makes the course feel more real. And trust me, when you're staring at it for hours, that makes a difference.
Resolution: 1080p vs. 4K – Is it Worth the Extra Coin?
This is where your budget and priorities really come into play.
- 1080p (Full HD): This is the workhorse resolution for 95% of golf simulators, and frankly, it's fantastic. Most golf simulator software renders beautifully in 1080p. The image is sharp enough, and you'll get a great, immersive experience. Both the BenQ TH671ST and Optoma GT1080HDR/GT2000HDR are 1080p and deliver incredible value.
- 4K UHD: Yeah, it looks gorgeous. If you're running a high-end gaming PC and your simulator software supports native 4K output, you'll notice the crispness, especially on grass textures and distant details. However, it comes with a few caveats:
- Cost: 4K short-throw projectors are significantly more expensive (easily $500-$1000 more).
- PC Power: You'll need a much beefier graphics card to render golf sim software at 4K resolution smoothly. If your PC is struggling, that 4K projector is just showing you a lower frame rate in higher definition.
- Screen Size: On a typical 10-12 foot wide impact screen, the difference between 1080p and 4K is noticeable if you're standing close, but less so from a normal hitting position.
- My Take: If money isn't an object, and you want the absolute best picture, go 4K. But if you're trying to stay within a budget, 1080p is more than enough and will provide an incredible experience. I started with 1080p and honestly, it's still what I primarily use, even with a 4K option available. My priority was a bright, clear image over ultra-HD pixels.
Throw Ratio: The Unsung Hero of Your Sim Bay
This is, in my opinion, the MOST CRITICAL spec for a home golf simulator. It dictates how far your projector needs to be from the screen to fill it.
What is it? A short throw projector (like the ones above) has a throw ratio typically between 0.5:1 and 0.7:1. This means for every 0.5 to 0.7 feet of throw distance, it projects 1 foot of image width.
Why Short Throw is KING:
- No Shadows: With a short throw projector, you mount it close to the screen (usually 4-7 feet away, depending on your screen width and the projector's throw ratio). This means it's behind your hitting position, so you and your club won't cast shadows on the screen. Shadows are distracting and kill immersion.
- Safety: Mounting it overhead and close means it's out of the way of any errant shots (heaven forbid). A standard throw projector often needs to be mounted much further back, sometimes even in the hitting area, which is a recipe for disaster.
- Space Efficiency: Most garage bays aren't 30 feet long. Short throw lets you get a massive picture in a tight space.
My Mistake: My first cheap projector was a standard throw. I had to mount it so far back, it was almost directly over my head, and I was constantly casting shadows. It was a nightmare. Upgrading to a short-throw was a game-changer.
How to Calculate:
- Minimum Throw Distance = Screen Width x Minimum Throw Ratio
- Maximum Throw Distance = Screen Width x Maximum Throw Ratio
- Example: For a 10-foot wide screen (120 inches) and a projector with a 0.5:1 throw ratio, your projector needs to be around 5 feet from the screen (10 feet * 0.5). For a 0.69:1 ratio, it'd be 6.9 feet.
Contrast Ratio, Refresh Rate, and Latency: Good to Know, Not Deal Breakers
- Contrast Ratio: The difference between the brightest whites and darkest blacks. Higher is better, but honestly, for a golf sim where you're mostly looking at bright golf courses, it's less critical than for a home theater. Don't chase this number too hard.
- Refresh Rate: How many times the image updates per second (Hz). 60Hz is standard. Some projectors do 120Hz. For a golf sim, 60Hz is perfectly fine. You're not playing fast-twitch esports.
- Latency (Input Lag): How long it takes for your projector to display what your computer sends it. Important for gaming, less so for golf. Most modern projectors are good enough here.
Real-World Projector Setup: My Garage Bay
My setup is pretty typical for a lot of us: a garage bay that's 10'W x 9'H x 18'D.
Mounting the Projector: Ceiling is Your Friend
- Ceiling Mount (Recommended): This is the cleanest, safest, and most common setup. My BenQ TH671ST is mounted to the ceiling with a universal projector mount. It's about 6 feet from my impact screen, projecting a crisp 10-foot wide image.
- Benefits: Out of the way, no shadows, secure.
- Considerations: Requires drilling into joists (use a stud finder!), cable management, and potentially a power outlet installed overhead. Make sure the mount can handle the projector's weight and offers enough adjustability for alignment (keystone correction helps, but mechanical alignment is always better).
- Floor Mount (Less Ideal, but Possible): Some guys build projector boxes on the floor.
- Benefits: No ceiling work, easier cable routing.
- Considerations: The box needs to be robust enough to withstand potential club strikes or foot traffic. It also adds an obstacle to your hitting area and needs to be placed carefully to avoid shadows. I've seen some clever setups, but I personally wouldn't want anything on the floor that could interfere with my swing path or be damaged.
Image Alignment and Keystone Correction
Once mounted, you'll need to align the image. Projectors usually have zoom and focus rings.
- Zoom: Adjusts the size of the image. Get it as close as you can with zoom.
- Focus: Makes the image sharp.
- Keystone Correction: This digitally squares up the image if the projector isn't perfectly perpendicular to the screen. USE IT SPARINGLY. Digital keystone correction slightly degrades image quality. Get your physical mount as aligned as possible first. The less digital correction, the better.
Ground Data Projectors: The Niche within a Niche
I saw a comment about adding a second projector for ground data. This is a cool idea for pros or serious data junkies who want to see club path lines, ball strike data, or shot traces projected onto the mat itself.
- My Opinion: For 99% of home simulator users, this is overkill. It's an extra projector, extra cables, extra setup complexity, and another potential point of failure. Most launch monitors display this data clearly on your main screen or a separate monitor.
- When it might make sense: If you're a coach, run lessons, or have a dedicated pro-level setup and want that specific visual feedback directly on the floor. Otherwise, save your money and keep it simple. My bay is for golf, not a research lab.
Who Should NOT Buy This
My signature anti-recommendations are here to save you headaches and cash.
1. Don't Buy a Standard Throw Projector (for a Sim)
Seriously, just don't. Unless you have a dedicated room that's 25+ feet long and you can mount it way, way back without shadows, you'll regret it. Shadows are annoying, and tripping over a projector stand is dangerous. Stick to short throw.
2. Don't Buy a Low-Lumen Projector (<3000 ANSI Lumens)
Unless your sim bay is a pitch-black